Using Reference Objects to do Object Classification
Once you have done a Count/Size operation to identify objects in an image, Image-Pro allows you to classify them. These instructions describe how to have Image-Pro auto-classify objects in an image based reference objects you provide.
To classify objects in an image based on reference objects:
Go to the Count/Size ribbon on the Image-Pro ribbon bar.
These instructions assume your image is already opened in the workspace and the objects have been counted.
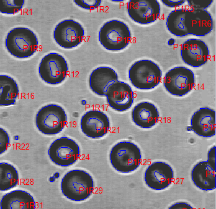
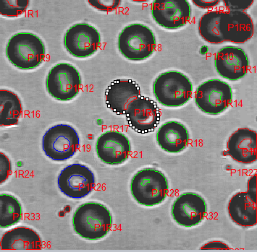
Classification of objects is based on specific measurements, so it is important to think about which measurements you are going to use to classify your objects, and to select them through the Type tool in the Measurements group. For example, supposed you wanted to identify the blood cells in the above image that were ideally 'doughnut'-shaped (circular with a large hole in the middle). The measurements of interest would be Circularity and Hole Area.
Click on the Type tool in the Measurements group.
The Measurement Types dialog box is displayed.
Select the measurements of interest in the Available Measurements panel, and click the Add button to add them to Selected Measurements/Filter area.
For example, for the image shown above, the "Circularity" and "Hole Area" measurements might be measurements of interest.
Close the Measurement Types dialog by clicking the [X] in the upper right corner.
In the Classify group, click on Learning.
The Learning Classification dialog box is displayed:
Put a check in the checkbox next to the measurements you selected in step 3. For example, if Circularity and Hole Area were selected as measurements of interest, you would put a check next to "Region:Circularity" and "Region:Hole Area" in the Learning Classification dialog box.
In the upper-most panel, click on the Class button.
An undefined class called "Class 1" is added to the panel.
The next step is to select one or more reference objects for the first class. To begin this process:
Click on the Select tool for "Class 1".
You are prompted to click on the object or objects that you want to use as the reference object(s).
Click on the object or objects in the image that you want to be the reference objects for Class 1.
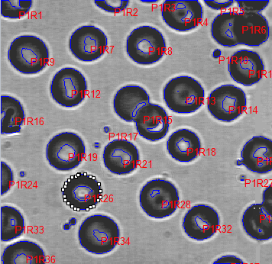
For example, click on the cells that are most ideally 'doughnut'-shaped. (Note that you can hold down the <Ctrl> key to select more than one object.)
Click OK in the Select objects prompt.
Repeat steps 7-10 for each class you want to define.
For example, we might define two more classes -- one for cells that are close to being ideally doughnut-shaped, and one for cells that are not at all close.
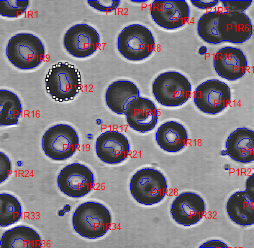
Class 2 Reference Object: Somewhat doughnut-shaped
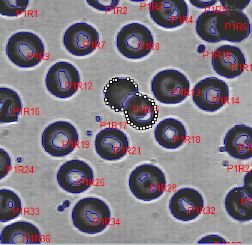
Class 3 Reference Object: Not at all doughnut-shaped
When all classes are identified, the Learning Classification dialog box lists all defined classes.
Click OK to have Image-Pro auto-classify objects in the image based on the current reference object selections.
The image is updated to show the color-coded class assignments of objects.
Review the resulting classification of object. If needed, you can adjust them by:
Selecting New Reference Objects for a Class
Click on the Edit tool on the line of the class you want to redefine.
The "Num" column is cleared, indicating that no reference object has been defined for the class.
Repeat steps 7-10 in the above procedure to define a new reference object (or reference objects).
Adding Weightings to the Measurements Used for Classification
Select the Auto weight check box in the tool bar of the Learning Classification dialog box.
Image-Proanalyzes your reference objects according to the classifiers (measurements) you have selected in order to determine optimal weight values to apply to the classifiers in order to achieve maximal differentiation between the classes.
See also:
Learn more about all features in Count/Size